Well here we are, on the second challenge hosted by Amy Warden at Great Cakes Soapworks. This one is called the mantra swirl, and it became famous after Nicole Benitez entered her version of it and won the January 2009 Best Swirl contest sponsored by Saponfier Magazine.
Since then, inspired soapmakers have created variations of this technique. I’ve been admiring the mantra swirl for several years, so this was a perfect opportunity to try my hand at it. Plus there’s a $100 gift certificate for the winner of the challenge, courtesy of
Majestic Mountain Sage!
My first batch came out just fine, except for some stearic spots (the little white  “bumps” you see scattered throughout). Just a cosmetic issue, but I didn’t think black and white had enough pizzazz to compete, although there’s a certain beauty in simplicity. And the wispy swirls, which were created with a skewer, should have shown up more. So making this soap was good practice for what I finally decided to create for the challenge. By the way, this is Onyx & Alabaster, and it will be available in my Etsy shop at the end of July.
So I started by making a couple of small soaps in pastel colors, with the intent of shredding them and incorporating them in the mantra soap. Since I had to make two small soaps, it was only a tiny bit of extra work to make twelve – two soaps each of six different colors! I liked these so much, I made another set of twelve in darker hues. These always come in handy for shredding or cutting into embeds.
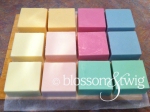

I chose one of the vibrant pink soaps on the left and one of the lime green soaps on the right, then used a fine grater to shred them up. One of these days I’m going to invest in a salad shooter!

With this part completed, it was time to begin. First, my silicone mold from Essential Depot (which I won at the recent HSCG conference) needed to be set up. My very handy husband had made a nice wood holder for the mold so the sides wouldn’t bow when filled with soap batter.
My recipe was a slow mover with one-third olive oil and no water discount because I needed time to work with the swirl without it setting up, and also because the shreds needed to be easily incorporated into the batter without producing air pockets.
The soft oils were measured out first so a teaspoonful could be added to some violet mica that had just arrived in the day’s mail. Then the hard oils were melted, cooled and added to the soft oils already in the pot. One of my favorite essential oil blends was added to the pot as well: lavandin (a lavender hybrid) and tea tree, with sweet notes of pink grapefruit, a hint of tart lemongrass, and a bit of light patchouli to anchor the top notes.

Time to add the lye! A small amount of titanium dioxide had been dissolved in the lye solution to help ensure a creamy-colored soap base. Once the lye solution was in, the batter was stick blended just to emulsion, then divided into three parts. The smallest portion went into the cup with the violet mica mixture, a large portion went into a cup with the lime green shreds, and the hot pink shreds were added to the portion remaining in the pot.
Now for the tricky part: the violet batter had to be poured into the narrow space between two acrylic dividers (also created by handy hubby), without any slipping underneath into the adjoining section. This turned out not to be too difficult – holding down the dividers with one hand while pouring slowly with the other, and only about an inch deep. Then the same process was repeated with the pink shreds batter and then the green shreds batter. This sort of equalized the pressure on the dividers, making it much easier to pour the rest of the soap.
Then the dividers were removed…
and it’s time to do the mantra swirl!
This time I decided to use the handle of a wooden spoon and really get in there with the swirling. It got in there, alright – these swirls are too thick! (Do you see the purple flamingos?)
A couple of days later it was ready to unmold and cut. To create the original mantra swirl, it can’t be sliced like most soaps. Instead, it has to be cut horizontally in 1-inch thick strips using a log splitter, then turned on end and sliced into individual bars. This is the same technique used to cut the peacock swirl soap in the last challenge. If you missed that post, instructions and photos are available here.
And here’s the cut of Rainbow Sherbet! 
All in all, I’m pretty pleased with how it turned out. It would have been better with darker green shreds so they’d show up better, and a chopstick would have created a much nicer swirl. But this is a fun technique, and it’s fun working with shreds, and I’m lovin’ the violet mica (of course, I’m a mica junkie so there’s not many I don’t like). And it smells delish! It’s on the curing rack now, and will be available in my Etsy shop in mid-August.
Special thanks to Blossom & Twig fans Katie S. and Laura P. for the color suggestions and for inspiring the name.
What do you think? Thumbs up or thumbs down?